Thursday, December 31, 2009

Skype’s Call Panel


When you make or receive a call, Skype adds a new tab panel, as shown in the following figure. In the center of the panel is a picture of the other party of the call, if they have set up their account to show their own picture; otherwise a default picture provided by Skype is shown. In the case of a conference call, pictures for all other parties to the call are tiled in the call panel. The duration of the call is displayed at the bottom of the call panel.

Skype's Tabs

When there is no call in progress, Skype usually has three tabbed panels—Contacts, Dial, and History—in its main window. Only one is displayed at any given time, and you can switch between panels by clicking on the tabs.
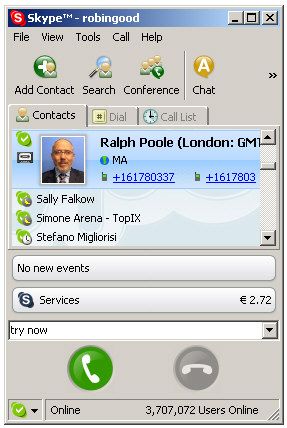
Clicking on the Contacts tab displays your contacts list panel, as shown in the following figure. In this panel you can select an existing contact to call, chat with, or send a file to. If you have contact grouping feature turned on, you can quickly filter your list of contacts by category. As a further aid to finding a contact, in this mode the address bar acts as a filtering tool, so that as you type a Skype username (or the name you have assigned to a user for display purposes) the closest match in your contact list is highlighted.
Clicking on the Dial tab displays Skype’s dialpad, which is shown in the next figure. The dialpad emulates the functions of a keypad that you might find on a regular or mobile phone. Clicking on the buttons of Skype’s dialpad enters the digits and symbols (*, +, and #) into the address bar. You can also use the keyboard to enter names and numbers into the address bar.
Clicking on the History tab displays a history of Skype events (missed calls, incoming calls, outgoing calls, voicemails, transferred files, and chats), as shown in the following figure. When the history panel is displayed, a small pulldown menu (next to a small picture of a magnifying glass) appears on the far left of the address bar. Use this pull-down menu to filter the event history to show only those events of interest.

Skype's Graphical Interface

Skype’s main window, as the next figure shows, contains quite a few graphical elements. In brief, here’s what each of Skype’s major graphical elements does:
  • Window title: Displayed in the title bar of Skype’s main window is the Skype username for the person who is currently signed in to Skype. In the accompanying figure, the name is “tcigtskype”, which is short for—no prizes for guessing correctly—The Complete Idiot’s Guide to Skype! This is the Skype username that will be used throughout this book. Yours will be different.
  • Main menu: The main menu is what gives you the most control when using or configuring Skype.
  • Toolbar: From the toolbar you can do things quickly and efficiently by clicking on an icon.
  • Notification bar: This bar is divided horizontally into four parts, from left to righBulleted Listt: Online Status (as a small pulldown menu), Full Name (if you’ve set one up, otherwise your Skype name is displayed), Events, and My Account. Clicking on the status portion of the bar drops down a menu from which you can set your online status. Clicking on your name drops down a text box, into which you can enter a short message that others will see when you are online. Clicking on Events drops down a box that shows all events, such as missed calls, that happened while you were away from Skype. The portion of the notification bar to the far right is labeled “My Account” if you are not yet a SkypeOut subscriber; if you are already a SkypeOut subscriber, it displays the value of your remaining SkypeOut credit balance. Clicking on this portion of the notification bar drops down a box that shows your subscription status to Skype services.
  • Tabs: The three tabs shown can be used to display the Contacts, Dial, and History panels, respectively. These three panels are dealt with in more detail in the pages that follow. When you make or receive a call, a new panel (and tab) will appear; again, this will be described in more detail in the following pages.
  • Contact groups: For your convenience, you can group your contacts into either predefined categories or categories you define yourself. Using this feature, you can quickly filter your contacts list to isolate only those contacts of interest. Moreover, by using contact groups, rather than individual entries in your contacts list, you can communicate more easily when you need to interact with many people at once. Note that contact grouping has to be enabled from the main menu: go to Skype: View and check Show Contact Groups.
  • Selected contact: When you select a contact in your contacts list by clicking on it, it expands to show additional information.
  • Other contacts: Contacts that are not selected show only their Skype username or a name you have assigned to them for display purposes in your contacts list. You can also show additional information about any contact by letting your mouse pointer hover over that contact.
  • Address bar: You can enter a Skype username or toll-free number or a regular telephone number (if you are a SkypeOut subscriber) in the address bar to start a call.
  • Call & hang-up buttons: Use the green call button to start a call; use the red hang-up button to end a call.
  • Status bar: On the far left of the status bar is a pull-down that enables you to set your online status. The number on the far right of the status bar indicates how many users are signed onto Skype. This number has grown, and continues to grow, at a phenomenal rate. This list is meant to give you an overview of Skype’s graphical user interface. Appendix D lists the names and the purpose of all Skype buttons and icons. For now, let’s take a closer look at some of the elements you’ll be using frequently.

Monday, November 30, 2009

Skype Conference Call

The more adventurous reader might want to quickly test some of the other features of Skype: conference calling, chat, and file transfer. To do that, you’ll need to have a handful of people setup in your contacts list. So get the Skype names of some friends (or use the Skype search feature [Skype: Contacts: Search for Skype Users …]) to populate your contacts list, and then try the following quick experiments. They’ll take only a few minutes and will be time well spent.
To make a conference call with Skype, select two or more people in your contacts list by holding down the Control key on your keyboard while clicking on the names with your mouse. Next, click on the Conference Call button on the toolbar, and the conference call should start in its own call tab.
To start a chat session with someone, click on their name in your contacts list and then click on the Chat button on the toolbar This opens Skype’s chat window and starts a chat session. To start a multi-chat session, just highlight more than one name in your contacts list (by holding down the Control key on your keyboard while clicking on their names with your mouse) and click on the Chat button.
Finally, try sending a file to someone. Click on a name in your contacts list and then click the Send File button on the toolbar. This opens a window which you can use to navigate to, and select, the file you want to send. Pick a file —any file—and click on the Open button. This initiates a file transfer. You can send a file to more than one person at the same time by selecting multiple names in your contact list before clicking on the Send File button.

Making First Skype Call


Skype has conveniently provided a call test service that enables you to test both your Skype softphone and your sound devices, ensuring that during a call others will be able to hear you, and you will be able to hear them.
To make a test call, click on the Contacts tab in the Skype softphone. Select the contact named Skype Test Call, and then click on the large round green button with a phone on it, as shown in the next figure. This connects you to the Skype test call service.
During a Skype test call, an automated voice at the other end of the call gives you instructions on how the test works. But in essence, the test consists of you talking to the test service and the test service playing back your voice to you. If you hear your own voice clearly, everything is working and you can start using Skype.
Congratulations! You’ve just made your first Skype call.

Skype Basic Configuration


Before you start using Skype, I encourage you to review the following checklist. This list covers problem areas and gotchas that often trip up new users of Skype. By casting your eyes over a short list of Skype configuration settings, you will most likely avoid any unpleasant surprises. So start Skype running, sign in, and check these items before making your first Skype call.
  • Skype: Tools: Options … : Privacy Check your privacy settings.Specifically, you can choose from whom you would, and would not, like to receive calls and chat.
  • Skype: Tools: Options … : Sound Devices Set your Audio In and Audio Out sound devices to the device or devices you wish to use with Skype. I do not recommend using the setting “Windows default device.”
  • Skype: Tools: Options … : Connection Make sure there’s a check mark opposite “Use port 80 and 443 as alternatives for incoming connections.”
  • Skype: Tools: Options … : Advanced Put a check mark opposite “Start Skype when I start Windows,” so that Skype will always be available when you’re using your computer.
Having worked through the checklist, you are now ready to make your first Skype call. But no matter who you call, you will no doubt want to impress them, right? Well, if so, perhaps there’s one last thing to do: make a test call.

Friday, October 30, 2009

Registering Skype Account

If you don’t already have a Skype user name and account, you’ll have to set one up. This will give you access to all of Skype’s free services (remember, it’s completely up to you whether you want to subscribe to any of Skype’s fee-based services).
Start Skype by double-clicking on its icon on your desktop, or from the Windows menu (go to Start: All Programs: Skype: Skype). This presents you with the Sign In window shown in the next figure. Click on the link Don’t have a Skype Name?, which displays the window.
Fill in the details for the Create a new Skype Account window, and then click on the Sign In button. You are now signed in to the Skype network, and you should see the Skype softphone displayed on your screen.
You’ll use your Skype name and password to sign in to the Skype website to manage your account and sign up for Skype’s fee-based subscription services.